
ConstraintLayout
ConstraintLayout은 화면에 다른 컴포저블을 기준으로 컴포저블을 배치할 수 있는 레이아웃입니다.
여러 중첩된 Column, Row, Box, BoxWithConstraints 등 대신 사용할 수 있습니다.
뷰 시스템에서는 ConstraintLayout이 크고 복잡한 레이아웃을 만드는 데 권장되는 방법이었지만, Compose에서는 이미 깊은 레이아웃 계층 구조를 효율적으로 처리하기 때문에 필수적이지 않습니다.
따라서, 다음의 시나리오에서 ConstrainLayout을 사용하는 것을 권장하고 있습니다.
- 코드 가독성 개선을 위해 여러 중첩된 레이아웃 대체
- 다른 컴포저블을 기준으로 컴포저블 배치
- GuideLine, Chain, Barrier를 기반으로 컴포저블 배치
Compose의 ConstraintLayout | Jetpack Compose | Android Developers
이 페이지는 Cloud Translation API를 통해 번역되었습니다. Compose의 ConstraintLayout 컬렉션을 사용해 정리하기 내 환경설정을 기준으로 콘텐츠를 저장하고 분류하세요. ConstraintLayout은 화면에 다른 컴포
developer.android.com
// ConstraintLayout 라이브러리 추가
implementation("androidx.constraintlayout:constraintlayout-compose:1.0.1")@Composable
inline fun ConstraintLayout(
constraintSet: ConstraintSet,
modifier: Modifier = Modifier,
optimizationLevel: Int = Optimizer.OPTIMIZATION_STANDARD,
animateChanges: Boolean = false,
animationSpec: AnimationSpec<Float> = tween<Float>(),
noinline finishedAnimationListener: (() -> Unit)? = null,
crossinline content: @Composable () -> Unit
): Unit
ConstraintLayout 사용하기
ConstraintLayout에서는 createRefs() 또는 createRefFor()을 사용하여 레퍼런스를 생성합니다.
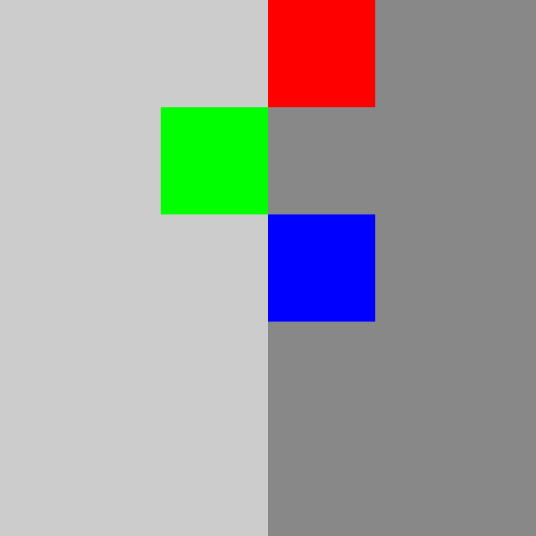
위의 두 방법을 사용하여 다음 화면을 만들어보자.

createRefs()
createRefs()는 여러 개의 레퍼런스를 생성하여 리턴하므로 destruction을 통해 레퍼런스를 각각 가져와 사용합니다.
constrainAs()를 통해 인자로 레퍼런스를 전달하고 본문 람다에 constraint를 설정합니다.
여기서 constraint는 linkTo() 또는 다른 메서드를 사용하여 설정할 수 있습니다.
@Stable
fun createRefs() =
        referencesObject ?: ConstrainedLayoutReferences().also { referencesObject = it }

inner class ConstrainedLayoutReferences internal constructor() {
    operator fun component1() = createRef()
    operator fun component2() = createRef()
    operator fun component3() = createRef()
    operator fun component4() = createRef()
    operator fun component5() = createRef()
    operator fun component6() = createRef()
    operator fun component7() = createRef()
    operator fun component8() = createRef()
    operator fun component9() = createRef()
    operator fun component10() = createRef()
    operator fun component11() = createRef()
    operator fun component12() = createRef()
    operator fun component13() = createRef()
    operator fun component14() = createRef()
    operator fun component15() = createRef()
    operator fun component16() = createRef()
}@Composable
fun ConstraintLayoutExample() {
ConstraintLayout(
modifier = Modifier
.size(300.dp)
.background(Color.LightGray)
) {
// createRefs()를 통해 아래 박스들의 레퍼런스를 가져옴
val (redBox, greenBox, blueBox) = createRefs()
Box(
// constraintsAs()를 통헤 레퍼런스 전달
// linkTo()를 통해 anchor와 margin 설정
modifier = Modifier
.size(40.dp)
.background(Color.Red)
.constrainAs(redBox) {
start.linkTo(
anchor = parent.start,
margin = 16.dp
)
top.linkTo(
anchor = parent.top,
margin = 32.dp
)
}
)
Box(
// 정가운데로 위치하고 싶을 때에는 centerTo() 사용 가능
modifier = Modifier
.size(40.dp)
.background(Color.Green)
.constrainAs(greenBox) {
centerTo(parent)
}
)
Box(
// 다른 컴포저블을 기준으로 배치 가능
modifier = Modifier
.size(40.dp)
.background(Color.Blue)
.constrainAs(blueBox) {
start.linkTo(anchor = redBox.end)
top.linkTo(anchor = redBox.bottom)
}
)
}
}
createRefFor()
createRefFor()는 인자로 넣은 id를 갖는 ConstraintLayout 요소에 해당하는 하나의 레퍼런스를 생성하는 역할을 합니다.
constrain()의 인자에 생성한 레퍼런스를 넣으면 해당 요소에 constraint를 설정할 수 있습니다.
이렇게 설정한 여러 constraint들을 담아 ConstraintSet을 생성하고 이를 매개변수로 ConstraintLayout에 전달합니다.
이때, ConstraintLayout 안에서는 layoutId()를 사용하여 각 요소마다 id 값을 설정해주어야 합니다.
fun createRefFor(id: Any) = ConstrainedLayoutReference(id)

fun constrain(
    ref: ConstrainedLayoutReference,
    constrainBlock: ConstrainScope.() -> Unit
) = ConstrainScope(ref.id).apply {
    constrainBlock()
    this@ConstraintSetScope.tasks.addAll(this.tasks)
}@Composable
fun ConstraintLayoutExample() {
// createRefFor()을 통해 박스들의 레퍼런스 생성
// 파라미터에 각 박스의 레퍼런스 id 설정
val constraintSet = ConstraintSet {
val redBox = createRefFor("redBox")
val greenBox = createRefFor("greenBox")
val blueBox = createRefFor("blueBox")
constrain(redBox) {
start.linkTo(
anchor = parent.start,
margin = 16.dp
)
top.linkTo(
anchor = parent.top,
margin = 32.dp
)
}
constrain(greenBox) {
centerTo(parent)
}
constrain(blueBox) {
start.linkTo(anchor = redBox.end)
top.linkTo(anchor = redBox.bottom)
}
}
// ConstraintLayout의 첫 인자로 ConstraintSet 전달
ConstraintLayout(
constraintSet = constraintSet,
modifier = Modifier
.size(300.dp)
.background(Color.LightGray)
) {
// 박스마다 layoutId 설정
Box(
modifier = Modifier
.size(40.dp)
.background(Color.Red)
.layoutId("redBox")
)
Box(
modifier = Modifier
.size(40.dp)
.background(Color.Green)
.layoutId("greenBox")
)
Box(
modifier = Modifier
.size(40.dp)
.background(Color.BLUE)
.layoutId("blueBox")
)
}
}
ConstraintLayout의 기능
Guideline
Guideline은 ConstraintLayout 내에서 위치를 정하는 보조선을 정의하는 데 사용됩니다.
이를 통해 자식 컴포저블을 특정 비율(percentage)이나 절대적인 위치(dp)에 맞추어 배치할 수 있습니다.
createGuidelineFrom...()을 통해 Guideline을 생성할 수 있습니다.
- createGuidelineFromStart, createGuidelineFromEnd : 수직 가이드라인 생성
- createGuidelineFromTop, createGuidelineFromBottom : 수평 가이드라인 생성
Compose의 ConstraintLayout | Jetpack Compose | Android Developers
이 페이지는 Cloud Translation API를 통해 번역되었습니다. Compose의 ConstraintLayout 컬렉션을 사용해 정리하기 내 환경설정을 기준으로 콘텐츠를 저장하고 분류하세요. ConstraintLayout은 화면에 다른 컴포
developer.android.com
@Composable
fun GuidelineExample() {
    ConstraintLayout(modifier = Modifier.size(200.dp)) {
        val (leftBox, rightBox, redBox, greenBox, blueBox) = createRefs()

        // 수직 가이드라인을 전체의 50% 부분에 설정
        val guideline = createGuidelineFromStart(fraction = 0.5f)

        // 왼쪽 영역
        Box(
            modifier = Modifier
                .constrainAs(leftBox) {
                    top.linkTo(parent.top)
                    start.linkTo(parent.start)
                    bottom.linkTo(parent.bottom)
                    end.linkTo(rightBox.start)
                    width = Dimension.percent(0.5f)
                    height = Dimension.fillToConstraints
                }
                .background(Color.LightGray)
        )
        // 오른쪽 영역
        Box(
            modifier = Modifier
                .constrainAs(rightBox) {
                    top.linkTo(parent.top)
                    start.linkTo(leftBox.end)
                    bottom.linkTo(parent.bottom)
                    end.linkTo(parent.end)
                    width = Dimension.percent(0.5f)
                    height = Dimension.fillToConstraints
                }
                .background(Color.Gray)
        )

        Box(modifier = Modifier
            .size(40.dp)
            .background(Color.Red)
            .constrainAs(redBox) {
                start.linkTo(guideline)
            }
        )
        Box(modifier = Modifier
            .size(40.dp)
            .background(Color.Green)
            .constrainAs(greenBox) {
                end.linkTo(guideline)
                top.linkTo(redBox.bottom)
            }
        )
        Box(modifier = Modifier
            .size(40.dp)
            .background(Color.Blue)
            .constrainAs(blueBox) {
                start.linkTo(guideline)
                top.linkTo(greenBox.bottom)
            }
        )
    }
}
Chain
Chain은 ConstraintLayout 내에서 컴포저블들을 수평 또는 수직으로 연속적으로 배치할 때 사용됩니다.
Chain을 사용하면 여러 컴포저블들 간의 공간을 균등하게 배분하거나 특정 방식으로 배치할 수 있습니다.
- createVerticalChain : 수직 방향으로 Chain 생성
- createHorizontalChain : 수평 방향으로 Chain 생성
다음 그림을 보면 Chain에 설정할 수 있는 chainStyle의 종류를 알 수 있습니다.

Compose의 ConstraintLayout | Jetpack Compose | Android Developers
이 페이지는 Cloud Translation API를 통해 번역되었습니다. Compose의 ConstraintLayout 컬렉션을 사용해 정리하기 내 환경설정을 기준으로 콘텐츠를 저장하고 분류하세요. ConstraintLayout은 화면에 다른 컴포
developer.android.com
@Composable
fun ChainExample() {
    ConstraintLayout(modifier = Modifier
        .size(200.dp)
        .background(Color.LightGray)
    ) {
        val (redBox, greenBox, blueBox) = createRefs()

        Box(
            modifier = Modifier
                .size(40.dp)
                .background(Color.Red)
                .constrainAs(redBox) {
                    top.linkTo(parent.top)
                }
        )
        Box(
            modifier = Modifier
                .size(40.dp)
                .background(Color.Green)
                .constrainAs(greenBox) {
                    top.linkTo(parent.top)
                }
        )
        Box(
            modifier = Modifier
                .size(40.dp)
                .background(Color.Blue)
                .constrainAs(blueBox) {
                    top.linkTo(parent.top)
                }
        )

        createVerticalChain(
            redBox, greenBox, blueBox,
            chainStyle = ChainStyle.Packed
        )
        createHorizontalChain(
            redBox, greenBox, blueBox,
            chainStyle = ChainStyle.SpreadInside
        )
    }
}
Barrier
Barrier는 ConstraintLayout 내에서 여러 컴포저블들의 경계를 정의하는 데 사용됩니다.
Barrier는 지정된 방향으로 여러 컴포저블들의 가장자리를 기준으로 새로운 제약 조건을 설정합니다.
- createStartBarrier, createEndBarrier, createTopBarrier, createBottomBarrier
Compose의 ConstraintLayout | Jetpack Compose | Android Developers
이 페이지는 Cloud Translation API를 통해 번역되었습니다. Compose의 ConstraintLayout 컬렉션을 사용해 정리하기 내 환경설정을 기준으로 콘텐츠를 저장하고 분류하세요. ConstraintLayout은 화면에 다른 컴포
developer.android.com
@Composable
fun BarrierExample() {
    ConstraintLayout(
        modifier = Modifier
            .size(300.dp)
            .background(Color.LightGray)
    ) {
        val (redBox, greenBox, blueBox, text) = createRefs()

        Box(
            modifier = Modifier
                .size(40.dp)
                .background(Color.Red)
                .constrainAs(redBox) {
                    top.linkTo(parent.top, margin = 20.dp)
                }
        )
        Box(
            modifier = Modifier
                .size(40.dp)
                .background(Color.Green)
                .constrainAs(greenBox) {
                    top.linkTo(parent.top, margin = 80.dp)
                }
        )
        Box(
            modifier = Modifier
                .size(40.dp)
                .background(Color.Blue)
                .constrainAs(blueBox) {
                    top.linkTo(parent.top, margin = 40.dp)
                }
        )

        createHorizontalChain(
            redBox, greenBox, blueBox,
            chainStyle = ChainStyle.SpreadInside
        )

        // 모든 박스들의 하단을 포함하는 Barrier 생성
        val barrier = createBottomBarrier(redBox, greenBox, blueBox)

        // 만든 Barrier에 Text의 top을 연결
        Text(
            text = "If you cannot fly then run. " +
                    "If you cannot run, then walk. " +
                    "And, if you cannot walk, then crawl, " +
                    "but whatever you do, you have to keep moving forward.",
            modifier = Modifier.constrainAs(text) {
                top.linkTo(barrier)
            }
        )
    }
}
'안드로이드 > Compose' 카테고리의 다른 글
| [Android] Compose - 부수 효과 (0) | 2024.05.27 |
|---|---|
| [Android] Compose - Animation (0) | 2024.05.25 |
| [Android] Compose - Lazy layout (0) | 2024.05.15 |
| [Android] Compose 컴포넌트 - Image (0) | 2024.05.13 |
| [Android] Compose 컴포넌트 - Material Design (0) | 2024.05.11 |